我们将要讨论的不是标准 Scala 的代码。如果你喜欢使用 REPL 学习,你可能想知道如何获得一个加入 Finagle 及其依赖的 Scala REPL。
你可以在这里获取 Finagle 源代码。
如果你在 finagle 目录下有 Finagle 的源代码,你可以通过下面的命令得到一个控制台
$ cd finagle
$ ./sbt "project finagle-http" console
 ...build output...
scala>
Finagle 使用 com.twitter.util.Future [1]编码延迟操作。Future 是尚未生成的值的一个句柄。Finagle 使用 Future 作为其异步 API 的返回值。同步 API 会在返回前等待结果;但是异步 API 则不会等待。例如,个对互联网上一些服务的HTTP请求可能半秒都不会返回。你不希望你的程序阻塞等待半秒。“慢”的 API 可以立即返回一个 Future,然后在需要解析其值时“填充”。
val myFuture = MySlowService(request) // returns right away
   ...do other things...
val serviceResult = myFuture.get() // blocks until service "fills in" myFuture
在实践中,你不会发送一个请求,然后在几行代码后调用 myFuture.get。Future 提供了注册回调的方法,在值变得可用时会调用注册的回调函数。
如果你用过其他异步 API,当看到“回调”你也许会畏缩。你可能会联想到他们难以辨认的代码流,被调用的函数藏在离调用处远远的地方。但是,Future 可以利用 Scala 中“函数是一等公民”的特性编写出更可读的代码流。你可以在调用它的地方简单地定义一个处理函数。
例如,写代码调度请求,然后“处理”回应,你可以保持代码在一起:
val future = dispatch(req) // returns immediately, but future is "empty"
future onSuccess { reply => // when the future gets "filled", use its value
  println(reply)
}
你可以在 REPL 中用体验一下 Future。虽然不是学习如何在实际代码中使用他们的好方法,但可以帮助理解 API。当你使用 REPL,Promise 是一个方便的类。它是 Future 抽象类的一个具体子类。你可以用它来创建一个还没有值的 Future。
scala> import com.twitter.util.{Future,Promise}
import com.twitter.util.{Future, Promise}

scala> val f6 = Future.value(6) // create already-resolved future
f6: com.twitter.util.Future[Int] = com.twitter.util.ConstFuture@c63a8af

scala> f6.get()
res0: Int = 6

scala> val fex = Future.exception(new Exception) // create resolved sad future
fex: com.twitter.util.Future[Nothing] = com.twitter.util.ConstFuture@38ddab20

scala> fex.get()
java.lang.Exception
  ... stack trace ...

scala> val pr7 = new Promise[Int] // create unresolved future
pr7: com.twitter.util.Promise[Int] = Promise@1994943491(...)

scala> pr7.get()
  ...console hangs, waiting for future to resolve...
Ctrl-C
Execution interrupted by signal.

scala> pr7.setValue(7)

scala> pr7.get()
res1: Int = 7

scala>
在实际代码中使用 Future 时,你通常不会调用 get,而是使用回调函数。get 仅仅是方便在 REPL 修修补补。
Future 有类似集合 API 中的组合子(如 map, flatMap) 。回顾一下集合组合子,它让你可以表达如 “我有一个整数 List 和一个 square 函数:map 那个列表获得整数平方的列表”这样的操作。这种表达方式很灵巧;你可以把组合子函数和另一个函数放在一起有效地组成一个新函数。面向 Future 的组合子可以让你这样表达:“我有一个期望整数的 Future 和一个 square 函数:map 那个 Future 获得一个期望整数平方的 Future”。
如果你在定义一个异步 API,传入一个请求值,你的 API 应该返回一个包装在 Future 中的响应。因此,这些把输入和函数加入 Future 的组合子是相当有用的:它们帮助你根据其它异步 API 定义你自己的异步 API。
最重要的 Future 的组合子是 flatMap[2]:
def Future[A].flatMap[B](f: A => Future[B]): Future[B]
flatMap 序列化两个 Future。即,它接受一个Future和一个异步函数,并返回另一个 Future。方法签名中是这样写的:给定一个 Future 成功的值,函数f提供下一个 Future。如果/当输入的 Future 成功完成,flatMap 自动调用f。只有当这两个 Future 都已完成,此操作所代表的 Future才算完成。如果任何一个 Future 失败,则操作确定的 Future 也将失败。这种隐交织的错误让我们只需要在必要时来处理错误,所以语法意义很大。flatMap 是这些语义组合子的标准名称。
如果你有一个 Future 并且想在异步 API 使用其值,使用 flatMap。例如,假设你有一个 Future[User],需要一个 Future[Boolean]表示用户是否已被禁止。有一个 isBanned 的异步 API 来判断一个用户是否已被禁止。此时可以使用 flatMap :
scala> import com.twitter.util.{Future,Promise}
import com.twitter.util.{Future, Promise}

scala> class User(n: String) { val name = n }
defined class User

scala> def isBanned(u: User) = { Future.value(false) }
isBanned: (u: User)com.twitter.util.Future[Boolean]

scala> val pru = new Promise[User]
pru: com.twitter.util.Promise[User] = Promise@897588993(...)

scala> val futBan = pru flatMap isBanned // apply isBanned to future
futBan: com.twitter.util.Future[Boolean] = Promise@1733189548(...)

scala> futBan.get()
  ...REPL hangs, futBan not resolved yet...
Ctrl-C
Execution interrupted by signal.

scala> pru.setValue(new User("prudence"))

scala> futBan.get()
res45: Boolean = false

scala>
同样,如果要在 Future 中应用一个同步函数,可以使用 map。例如,假设你有一个 Future[RawCredentials] 需要一个 Future[Credentials]。你有一个的同步的 normalize 函数将 RawCredentials 转换成 Credentials。可以使用 map:
scala> class RawCredentials(u: String, pw: String) {
     |   val username = u
     |   val password = pw
     | }
defined class RawCredentials

scala> class Credentials(u: String, pw: String) {
     |   val username = u
     |   val password = pw
     | }
defined class Credentials

scala> def normalize(raw: RawCredentials) = {
     |   new Credentials(raw.username.toLowerCase(), raw.password)
     | }
normalize: (raw: RawCredentials)Credentials

scala> val praw = new Promise[RawCredentials]
praw: com.twitter.util.Promise[RawCredentials] = Promise@1341283926(...)

scala> val fcred = praw map normalize // apply normalize to future
fcred: com.twitter.util.Future[Credentials] = Promise@1309582018(...)

scala> fcred.get()
   ...REPL hangs, fcred doesn't have a value yet...
Ctrl-C
Execution interrupted by signal.

scala> praw.setValue(new RawCredentials("Florence", "nightingale"))

scala> fcred.get().username
res48: String = florence

scala>
Scala 有快捷语法来调用 flatMap:for 表达式。假设你想通过异步 API 验证登录请求,然后通过另一个异步 API 检查用户是否被禁止。在 for 表达式的帮助下,我们可以这样写:
scala> def authenticate(req: LoginRequest) = {
     |   // TODO: we should check the password
     |   Future.value(new User(req.username))
     | }
authenticate: (req: LoginRequest)com.twitter.util.Future[User]

scala> val f = for {
     |  u <- authenticate(request)
     |  b <- isBanned(u)
     | } yield (u, b)
f: com.twitter.util.Future[(User, Boolean)] = Promise@35785606(...)

scala>
它产生一个 f: Future[(User, Boolean)],包含用户对象和一个表示该用户是否已被禁止的布尔值。注意这里是怎样实现顺序组合的:isBanned 使用了 authenticate 的输出作为其输入。
你可能想一次获取来自多个服务的数据。例如,如果你正在编写一个 Web 服务来显示内容和广告,它可能会从两个服务中分别获取内容和广告。但是,你怎么告诉代码来等待两份答复呢?如果必须自己实现可能会非常棘手,幸运的是你可以使用并发组合子。
Future 提供了一些并发组合子。一般来说,他们都是将 Future 的一个序列转换成包含一个序列的 Future,只是方式略微不同。这是很好的,因为它(本质上)可以让你把几个 Future 封装成一个单一的 Future。
object Future {
  …
  def collect[A](fs: Seq[Future[A]]): Future[Seq[A]]
  def join(fs: Seq[Future[_]]): Future[Unit]
  def select(fs: Seq[Future[A]]) : Future[(Try[A], Seq[Future[A]])]
}
collect 参数是具有相同类型 Future 的一个集合,返回一个 Future,其类型是包含那个类型值的一个序列。当所有的 Future 都成功完成或者当中任何一个失败,都会使这个 Future 完成。返回序列的顺序和传入序列的顺序相对应。
scala> val f2 = Future.value(2)
f2: com.twitter.util.Future[Int] = com.twitter.util.ConstFuture@13ecdec0

scala> val f3 = Future.value(3)
f3: com.twitter.util.Future[Int] = com.twitter.util.ConstFuture@263bb672

scala> val f23 = Future.collect(Seq(f2, f3))
f23: com.twitter.util.Future[Seq[Int]] = Promise@635209178(...)

scala> val f5 = f23 map (_.sum)
f5: com.twitter.util.Future[Int] = Promise@1954478838(...)

scala> f5.get()
res9: Int = 5
join 参数是混合类型的 Future 序列,返回一个 Future[Unit],当所有的相关 Future 完成时(无论他们是否失败)该 Future 完成。其作用是标识一组异构操作完成。对那个内容和广告的例子来说,这可能是一个很好的解决方案。
scala> val ready = Future.join(Seq(f2, f3))
ready: com.twitter.util.Future[Unit] = Promise@699347471(...)

scala> ready.get() // doesn't ret value, but I know my futures are done

scala>
当传入的 Future 序列的第一个 Future 完成的时候,select 会返回一个 Future。它会将那个完成的 Future 和其它未完成的 Future 一起放在 Seq 中返回。 (它不会做任何事情来取消剩余的 Future。你可以等待更多的回应,或者忽略他们)
scala> val pr7 = new Promise[Int] // unresolved future
pr7: com.twitter.util.Promise[Int] = Promise@1608532943(...)

scala> val sel = Future.select(Seq(f2, pr7)) // select from 2 futs, one resolved
sel: com.twitter.util.Future[...] = Promise@1003382737(...)

scala> val(complete, stragglers) = sel.get()
complete: com.twitter.util.Try[Int] = Return(2)
stragglers: Seq[...] = List(...)

scala> complete.get()
res110: Int = 2

scala> stragglers(0).get() // our list of not-yet-finished futures has one item
  ...get() hangs the REPL because this straggling future is not finished...
Ctrl-C
Execution interrupted by signal.

scala> pr7.setValue(7)

scala> stragglers(0).get()
res113: Int = 7

scala>
组合例子:缓存速率限制
这些组合子表达了典型的网络服务操作。这段假设的代码在对速率进行限制(为了保持本地速率限制缓存)的同时,将用户的请求调度到后台服务:
// Find out if user is rate-limited. This can be slow; we have to ask
// the remote server that keeps track of who is rate-limited.
def isRateLimited(u: User): Future[Boolean] = {
  ...
}

// Notice how you can swap this implementation out now with something that might
// implement a different, more restrictive policy.

// Check the cache to find out if user is rate-limited. This cache
// implementation is just a Map, and can return a value right way. But we
// return a Future anyhow in case we need to use a slower implementation later.
def isLimitedByCache(u: User): Future[Boolean] =  Future.value(limitCache(u))

// Update the cache
def setIsLimitedInCache(user: User, v: Boolean) { limitCache(user) = v }

// Get a timeline of tweets... unless the user is rate-limited (then throw
// an exception instead)
def getTimeline(cred: Credentials): Future[Timeline] =
  isLimitedByCache(cred.user) flatMap {
    case true => Future.exception(new Exception("rate limited"))
    case false =>

      // First we get auth'd user then we get timeline.
      // Sequential composition of asynchronous APIs: use flatMap
      val timeline = auth(cred) flatMap(getTimeline)
      val limited = isRateLimited(cred.user) onSuccess(
                                       setIsLimitedInCache(cred.user, _))

      // 'join' concurrently combines differently-typed futures
      // 'flatMap' sequentially combines, specifies what to do next
      timeline join limited flatMap {
        case (_, true) => Future.exception(new Exception("rate limited"))
        case (timeline, _) => Future.value(timeline)
      }
  }
}
这个例子结合了顺序和并发组合。请注意,除了给转化速率限制回应一个异常以外,没有明确的错误处理。如果任何 Future 在这里失败,它会自动传播到返回的 Future 中。
你已经看到了怎样使用 Future 组合子的例子,不过也许意犹未尽。假设你有一个简单的互联网模型。该互联网中只有 HTML 网页和图片,其中页面可以链接到图像和其他网页。你可以获取一个页面或图像,但 API 是异步的。这个假设的 API 成这些“可获取”的数据为资源:
import com.twitter.util.{Try,Future,Promise}

// a fetchable thing
trait Resource {
  def imageLinks(): Seq[String]
  def links(): Seq[String]
}

// HTML pages can link to Imgs and to other HTML pages.
class HTMLPage(val i: Seq[String], val l: Seq[String]) extends Resource {
  def imageLinks() = i
  def links = l
}

// IMGs don't actually link to anything else
class Img() extends Resource {
  def imageLinks() = Seq()
  def links() = Seq()
}

// profile.html links to gallery.html and has an image link to portrait.jpg
val profile = new HTMLPage(Seq("portrait.jpg"), Seq("gallery.html"))
val portrait = new Img

// gallery.html links to profile.html and two images
val gallery = new HTMLPage(Seq("kitten.jpg", "puppy.jpg"), Seq("profile.html"))
val kitten = new Img
val puppy = new Img

val internet = Map(
  "profile.html" -> profile,
  "gallery.html" -> gallery,
  "portrait.jpg" -> portrait,
  "kitten.jpg" -> kitten,
  "puppy.jpg" -> puppy
)

// fetch(url) attempts to fetch a resource from our fake internet.
// Its returned Future might contain a Resource or an exception
def fetch(url: String) = { new Promise(Try(internet(url))) }
假设给定一个页面 URL,而你希望获取该页面的第一个图。也许你正在做一个网站,在上面用户可以发布有趣的网页链接。为了帮助其他用户决定某个链接是否值得追踪,你打算显示那个链接中第一张图像的缩略图。
即使你不知道组合子,你仍然可以写一个缩略图获取函数:
def getThumbnail(url: String): Future[Resource]={
  val returnVal = new Promise[Resource]

  fetch(url) onSuccess { page => // callback for successful page fetch
    fetch(page.imageLinks()(0)) onSuccess { p => // callback for successful img fetch
      returnVal.setValue(p)
    } onFailure { exc => // callback for failed img fetch
      returnVal.setException(exc)
    }
  } onFailure { exc => // callback for failed page fetch
    returnVal.setException(exc)
  }
  returnVal
}
这个版本的函数能工作。它的大部分内容用来解析 Future,然后把他们的内容传给另一个 Future。
我们希望得到一个页面,然后从该页面获得一个图像。如果你想获得 A,然后再获得 B 的,这通常意味着顺序组合。由于 B 是异步的,所以需要使用 flatMap:
def getThumbnail(url: String): Future[Resource] =
  fetch(url) flatMap { page => fetch(page.imageLinks()(0)) }
通过并发组合
抓取页面的第一个图片是好的,但也许我们应该获取所有图片,并让用户自己进行选择。我们可以使用for循环一个个地抓取,但这需要很长时间;所以我们想并行获取它们。如果你想的事情“并行”发生,这通常意味着并发组合。所以我们使用 Future.collect 的提取所有的图像:
def getThumbnails(url:String): Future[Seq[Resource]] =
  fetch(url) flatMap { page =>
    Future.collect(
      page.imageLinks map { u => fetch(u) }
    )
  }
如果这对你有意义,那太好了。你可能会看不懂这行代码 page.imageLinks map { u => fetch(u) }:它使用 map 和 map 后的函数返回一个 Future。当接下来的事情是返回一个Future时,我们不是应该使用flatMap吗?但是请注意,在 map 前的不是一个 Future;它是一个集合。collection map function 返回一个集合;我们使用 Future.collect 收集 Future 的集合到一个 Future 中。
除了页面中的图片以外,我们可能会想获取它链接的其他页面。通过递归我们可以构建一个简单的网络爬虫。
// Return
def crawl(url: String): Future[Seq[Resource]] =
  fetch(url) flatMap { page =>
    Future.collect(
      page.links map { u => crawl(u) }
    ) map { pps => pps.flatten }
}

crawl("profile.html")
   ...hangs REPL, infinite loop...
Ctrl-C
Execution interrupted by signal.

scala>
// She's gone rogue, captain! Have to take her out!
// Calling Thread.stop on runaway Thread[Thread-93,5,main] with offending code:
// scala> crawl("profile.html")
在实践中,这个网络爬虫不是很有用:首先我们没有告诉它何时停止爬行;其次即使资源刚刚被获取过,它仍然会不厌其烦地重新获取。
一个 Finagle 服务用来处理 RPC,读取请求并给予回复的。服务是针对请求和回应的一个函数Req => Future[Rep]。
abstract class Service[-Req, +Rep] extends (Req => Future[Rep])
在服务中,我们要同时定义客户端和服务器。
一个 Finagle 客户端“引入”一个网络服务。从概念上讲,Finagle 客户端由两部分组成
同样,Finagle 服务端“输出”网络服务。一个服务端由两个部分组成:
这种设计分离了服务的“业务逻辑”和数据如何在网络中流动的配置。
我们也谈论 Finagle “过滤器”。过滤器在服务之间,修改流经它的数据。过滤器可以很好地和服务组合在一起。例如,如果你有一个速率限制过滤器和一个 tweet 服务,你可以把它们组合在一起形成有速率限制的 tweet 服务。
一个 Finagle 客户端“引入”一个网络服务。它有一些配置来设定如何在网络上发送数据。一个简单的 HTTP 客户端可能看起来像这样:
import org.jboss.netty.handler.codec.http.{DefaultHttpRequest, HttpRequest, HttpResponse, HttpVersion, HttpMethod}
import com.twitter.finagle.Service
import com.twitter.finagle.builder.ClientBuilder
import com.twitter.finagle.http.Http

// Don't worry, we discuss this magic "ClientBuilder" later
val client: Service[HttpRequest, HttpResponse] = ClientBuilder()
  .codec(Http())
  .hosts("twitter.com:80") // If >1 host, client does simple load-balancing
  .hostConnectionLimit(1)
  .build()

val req = new DefaultHttpRequest(HttpVersion.HTTP_1_1, HttpMethod.GET, "/")

val f = client(req) // Client, send the request

// Handle the response:
f onSuccess { res =>
  println("got response", res)
} onFailure { exc =>
  println("failed :-(", exc)
}
服务端
一个服务端按服务进行定义,并配置如何“监听”网络上的请求。一个简单的 HTTP 服务端可能看起来像这样:
import com.twitter.finagle.Service
import com.twitter.finagle.http.Http
import com.twitter.util.Future
import org.jboss.netty.handler.codec.http.{DefaultHttpResponse, HttpVersion, HttpResponseStatus, HttpRequest, HttpResponse}
import java.net.{SocketAddress, InetSocketAddress}
import com.twitter.finagle.builder.{Server, ServerBuilder}
import com.twitter.finagle.builder.ServerBuilder

// Define our service: OK response for root, 404 for other paths
val rootService = new Service[HttpRequest, HttpResponse] {
  def apply(request: HttpRequest) = {
    val r = request.getUri match {
      case "/" => new DefaultHttpResponse(HttpVersion.HTTP_1_1, HttpResponseStatus.OK)
      case _ => new DefaultHttpResponse(HttpVersion.HTTP_1_1, HttpResponseStatus.NOT_FOUND)
    }
    Future.value(r)
  }
}

// Serve our service on a port
val address: SocketAddress = new InetSocketAddress(10000)
val server: Server = ServerBuilder()
  .codec(Http())
  .bindTo(address)
  .name("HttpServer")
  .build(rootService)
这个name是我们强加的,虽然没有在例子中使用它,但这个字段对分析和调试是很有用的。
过滤器改造服务,它们可以提供通用的服务功能。例如你有几个服务需要支持速率限制,这时可以写一个限速过滤器并将其应用于所有的服务就解决问题了。过滤器也可以将服务分解成不同的阶段。
一个简单的代理可能看起来像这样:
class MyService(client: Service[..]) extends Service[HttpRequest, HttpResponse]
{
  def apply(request: HttpRequest) = {
    client(rewriteReq(request)) map { res =>
      rewriteRes(res)
    }
  }
}
其中 rewriteReq 和 rewriteRes 可以提供协议翻译,例如。
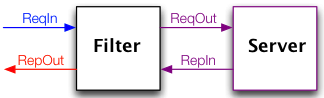
abstract class Filter[-ReqIn, +RepOut, +ReqOut, -RepIn]
  extends ((ReqIn, Service[ReqOut, RepIn]) => Future[RepOut])
通过图示可以更清晰地看出其类型:
((ReqIn, Service[ReqOut, RepIn])
         => Future[RepOut])

          (*   Service   *)
[ReqIn -> (ReqOut -> RepIn) -> RepOut]
下面的例子展示了怎样通过过滤器来提供服务超时机制。
class TimeoutFilter[Req, Rep](
  timeout: Duration,
  exception: RequestTimeoutException,
  timer: Timer)
  extends Filter[Req, Rep, Req, Rep]
{
  def this(timeout: Duration, timer: Timer) =
    this(timeout, new IndividualRequestTimeoutException(timeout), timer)

  def apply(request: Req, service: Service[Req, Rep]): Future[Rep] = {
    val res = service(request)

    res.within(timer, timeout) rescue {
      case _: java.util.concurrent.TimeoutException =>
        res.cancel()
        Trace.record(TimeoutFilter.TimeoutAnnotation)
        Future.exception(exception)
    }
  }
}
这个例子展示了怎样(通过认证服务)提供身份验证来将 Service[AuthHttpReq, HttpRep] 转换为 Service[HttpReq, HttpRep]。
class RequireAuthentication(authService: AuthService)
  extends Filter[HttpReq, HttpRep, AuthHttpReq, HttpRep] {
  def apply(
    req: HttpReq,
    service: Service[AuthHttpReq, HttpRep]
  ) = {
    authService.auth(req) flatMap {
      case AuthResult(AuthResultCode.OK, Some(passport), _) =>
        service(AuthHttpReq(req, passport))
      case ar: AuthResult =>
        Future.exception(
          new RequestUnauthenticated(ar.resultCode))
    }
  }
}
这样使用过滤器是有好处的。它可以帮助你将“身份验证逻辑”固定在一个地方。拥有一个独立的类型执行请求授权,会使追查程序安全问题变得更容易。
过滤器可以使用 andThen 组合在一起。传入一个 Service 参数给 andThen 将创建一个(添加了过滤功能)的Service(类型用来做说明)。
val authFilter: Filter[HttpReq, HttpRep, AuthHttpReq, HttpRep]
val timeoutfilter[Req, Rep]: Filter[Req, Rep, Req, Rep]
val serviceRequiringAuth: Service[AuthHttpReq, HttpRep]

val authenticateAndTimedOut: Filter[HttpReq, HttpRep, AuthHttpReq, HttpRep] =
  authFilter andThen timeoutFilter

val authenticatedTimedOutService: Service[HttpReq, HttpRep] =
  authenticateAndTimedOut andThen serviceRequiringAuth
生成器把所有组件组合在一起。一个 ClientBuilder 对给定的一组参数生成一个 Service,而一个 ServerBuilder 获取一个 Service 的实例,并调度传入请求给它。为了确定 Service 的类型,我们必须提供一个编解码器(Codec)。编解码器提供底层协议的实现(如 HTTP,thrift,memcached)。这两个 Builder 都有很多参数,其中一些是必填的。
下面是一个调用 ClientBuilder 的例子(类型用来做说明)
val client: Service[HttpRequest, HttpResponse] = ClientBuilder()
  .codec(Http)
  .hosts("host1.twitter.com:10000,host2.twitter.com:10001,host3.twitter.com:10003")
  .hostConnectionLimit(1)
  .tcpConnectTimeout(1.second)
  .retries(2)
  .reportTo(new OstrichStatsReceiver)
  .build()
这将构建一个客户端在三个主机上进行负载平衡,最多在每台主机建立一个连接,并在两次失败尝试后放弃。统计数据会报给 ostrich 。以下生成器选项是必须的(而且它们也被静态强制填写了):hosts 或 cluster, codec 和 hostConnectionLimit。
同样的,你也可以使用一个 ServerBuilder 来创建“监听”传入请求的服务:
val service = new MyService(...) // construct instance of your Finagle service
var filter = new MyFilter(...) // and maybe some filters
var filteredServce = filter andThen service
val  server = ServerBuilder()
  .bindTo(new InetSocketAddress(port))
  .codec(ThriftServerFramedCodec())
  .name("my filtered service")
//  .hostConnectionMaxLifeTime(5.minutes)
//  .readTimeout(2.minutes)
  .build(filteredService)
通过这些参数会生成一个Thrift服务器监听端口 port,并将请求分发给 service。如果我们去掉 hostConnectionMaxLifeTime 的注释,每个连接将被允许留存长达 5 分钟。如果我们去掉 readTimeout 的注释,那么我们就需要在 2 分钟之内发送请求。ServerBuilder 必选项有:name, bindTo 和 codec。
Finagle 自动操纵线程来保证服务顺利运行。但是,如果你的服务阻塞了,它会阻塞所有 Finagle 线程。
如果你的代码调用了一个阻塞操作(apply 或 get),使用 Future 池来包装阻塞代码。阻塞操作将运行在自己的线程池中,返回一个 Future 来完成(或失败)这个操作,并可以和其它 Future 组合。 如果你的代码中使用 Future 的顺序组合,不用担心它会“阻塞”组合中的 Future。
[1]小心,还有其它“Future”类。不要将 com.twitter.util.Future 和scala.actor.Future 或 java.util.concurrent.Future 混淆起来!
[2] 如果你学习类型系统和/或分类理论,你会高兴地发现 flatMap 相当于一元绑定。
邮箱 626512443@qq.com
电话 18611320371(微信)
QQ群 235681453
Copyright © 2015-2024
备案号:京ICP备15003423号-3